Quantizing Images: OctTree
2021-05-22
0. 前言
除了文字之外,图片也是互联网的重要组成部分,一般来说一个 banner-ad 所需要的空间是 14,246 bytes,而不是普通图片的 196,560 bytes。
那么为什么这两个数字差那么多呢?我们今天就来学习一下 digital image 相关的算法。
1. Digital Image
每张图片都包含很多的 pixels,每个 pixels 都是一个小矩形,有一个特定的颜色。
pixel 的颜色都是用三原色 - 红、绿、蓝混合而成的,这和我们在现实世界中看到的颜色是有所不同的。
正如计算机的浮点数是一个大概的数字,计算机里面的颜色也是一个大概的颜色。人类的眼睛可以区别三原色里面每个原色大约200种不同的变化,也就是大约8百万种不同的颜色。
而在电脑中,我们用 1 byte(8 bits)来代表每个 pixel 的三原色,也就是 256 种不同的红色、256种不同的绿色、256种不同的蓝色,每个 pixel 可以有 16.7 million 不同的颜色。
In the physical world colors are not discrete quantities. The colors in our physical world have an infinite amount of variation to them.
The human eye can distinguish between 200 different levels in each of the three primary colors, or a total of about 8 million individual colors.
虽然这么多的颜色看起来是件好事,但是我们所需要的图片储存空间也更大了,比如一张百万像素相机拍出来的照片需要 3MB 的储存空间。
Python
在 Python 里面,我们用 a list of a list of tuples 来代表图片,tuple 包含 3 个从 0 到 255 的数字,每个数字代表红绿蓝三原色中的一个。
im = [[(255,255,255),(255,255,255),(255,255,255),(12,28,255),
      (12,28,255),(255,255,255),(255,255,255),(255,255,255),],
      [(255,255,255),(255,255,255),(12,28,255),(255,255,255),
       (255,255,255),(12,28,255),(255,255,255),(255,255,255)],
 ... ]
白色是(255, 255, 255),你可以通过下面的方式来获取任何一个 pixel:
im[3][2]
// (255, 18, 39)
C++, Java
在这两种语言中,每个图片都是用 2-d array 来表示的。
图片的存储
我们可以通过存储这些数字来存储图片,在 Python 中,我们用一个叫做 Pillow 的 package 来创建 image class,这个 class 能让我们 get/set pixels.
getpixel((col, row))andputpixel((col, row), color)- 注意这里的顺序是 col, row 而不是 row, col。
2. Quantizing an Image
目标:想要节约图片的储存空间。
一种简单的方法:用 fewer colors => fewer bits for each red, green and blue component => reduce memory requirements.
网络上最流行的一种图片格式只用 256 个颜色,这就能把 3 byte/ 1 pixel 减少到 1 byte/ 1 pixel。
那么。。怎么减少颜色呢?
答案是:Quantization(量化)。
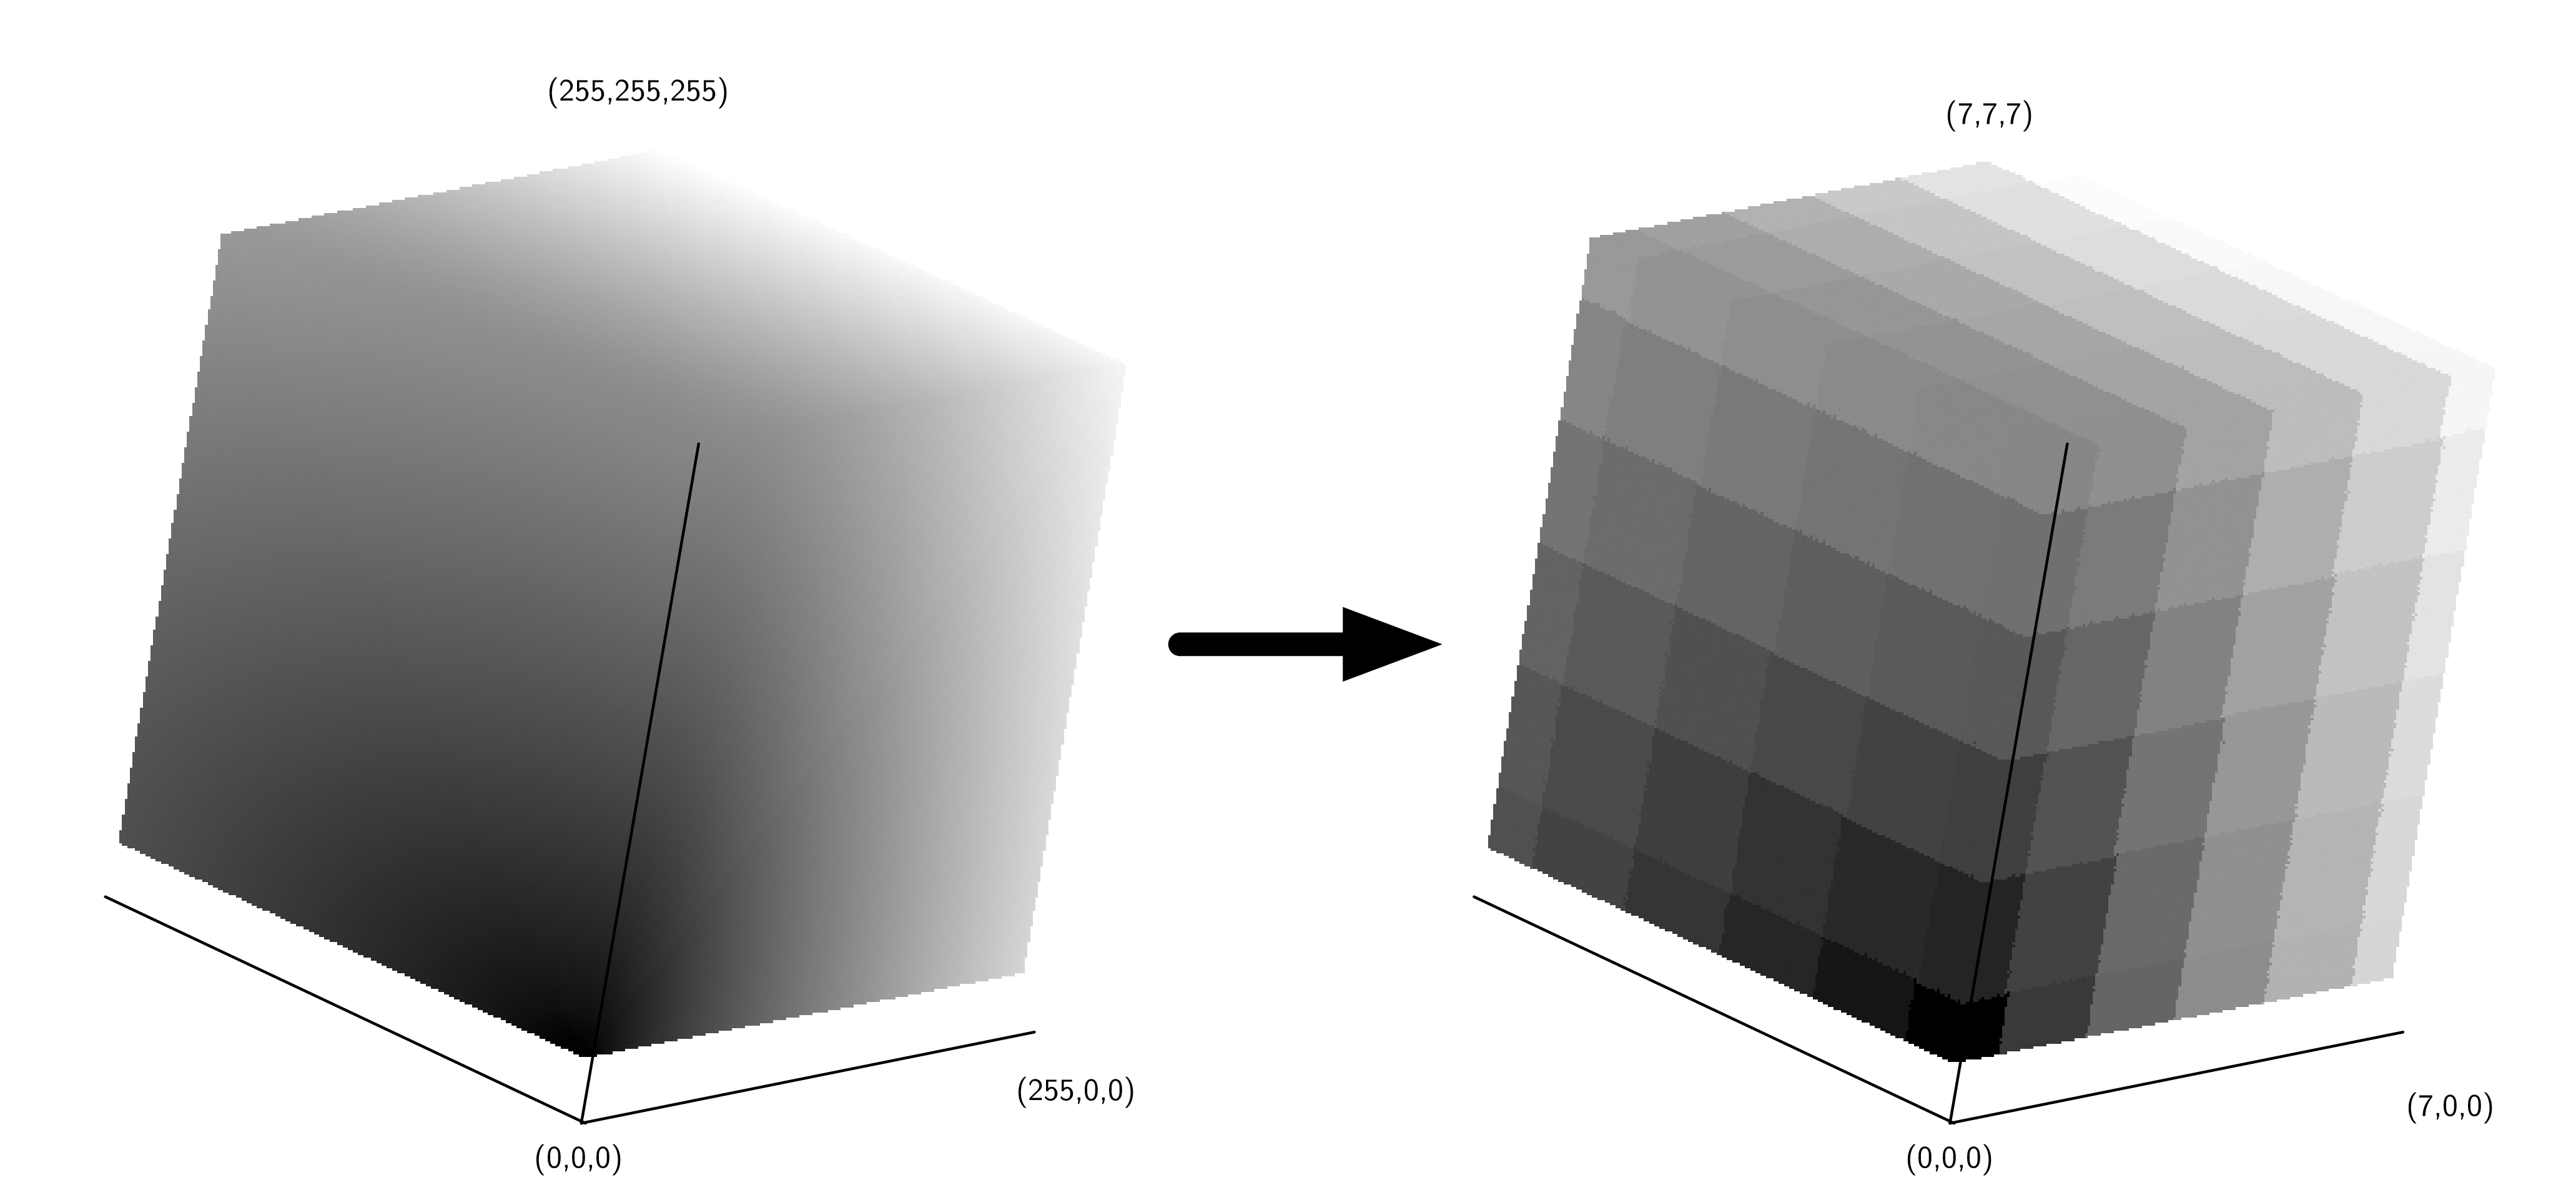
把三原色想象成一个立方体,x轴是红色,y轴是绿色,z轴是蓝色,总共有 256x256x256 个小立方体,数字越小的越暗(0,0,0 是黑色),数字越大的越明亮(255,255,255 是白色)。
那么我们要把这个大的立方体缩小成一个小的立方体(8x8x8),多个大立方体里面的颜色会被 map 成一个小立方体里面的颜色(可以看到颜色之间的过渡没有那么平滑了,图片也丢失了很多的细节)。
Python Code
下面这个算法就可以完成立方体的压缩。
我们假设红色象限有7个不同的value,蓝色和蓝色象限里面有6个不同的value。
from PIL import Image


def simple_quant():
    im = Image.open("bubbles.jpg")
    w, h = im.size
    for row in range(h):
        for col in range(w):
            r, g, b = im.getpixel((col, row))
            r = r // 36 * 36
            g = g // 42 * 42
            b = b // 42 * 42
            im.putpixel((col, row), (r, g, b))
    im.show()
3. 改进版:OctTrees 量化算法
前面的简单版压缩法会让我们丢失很多图片的细节,我们现在来看看有没有一个更好的方法来压缩图片。
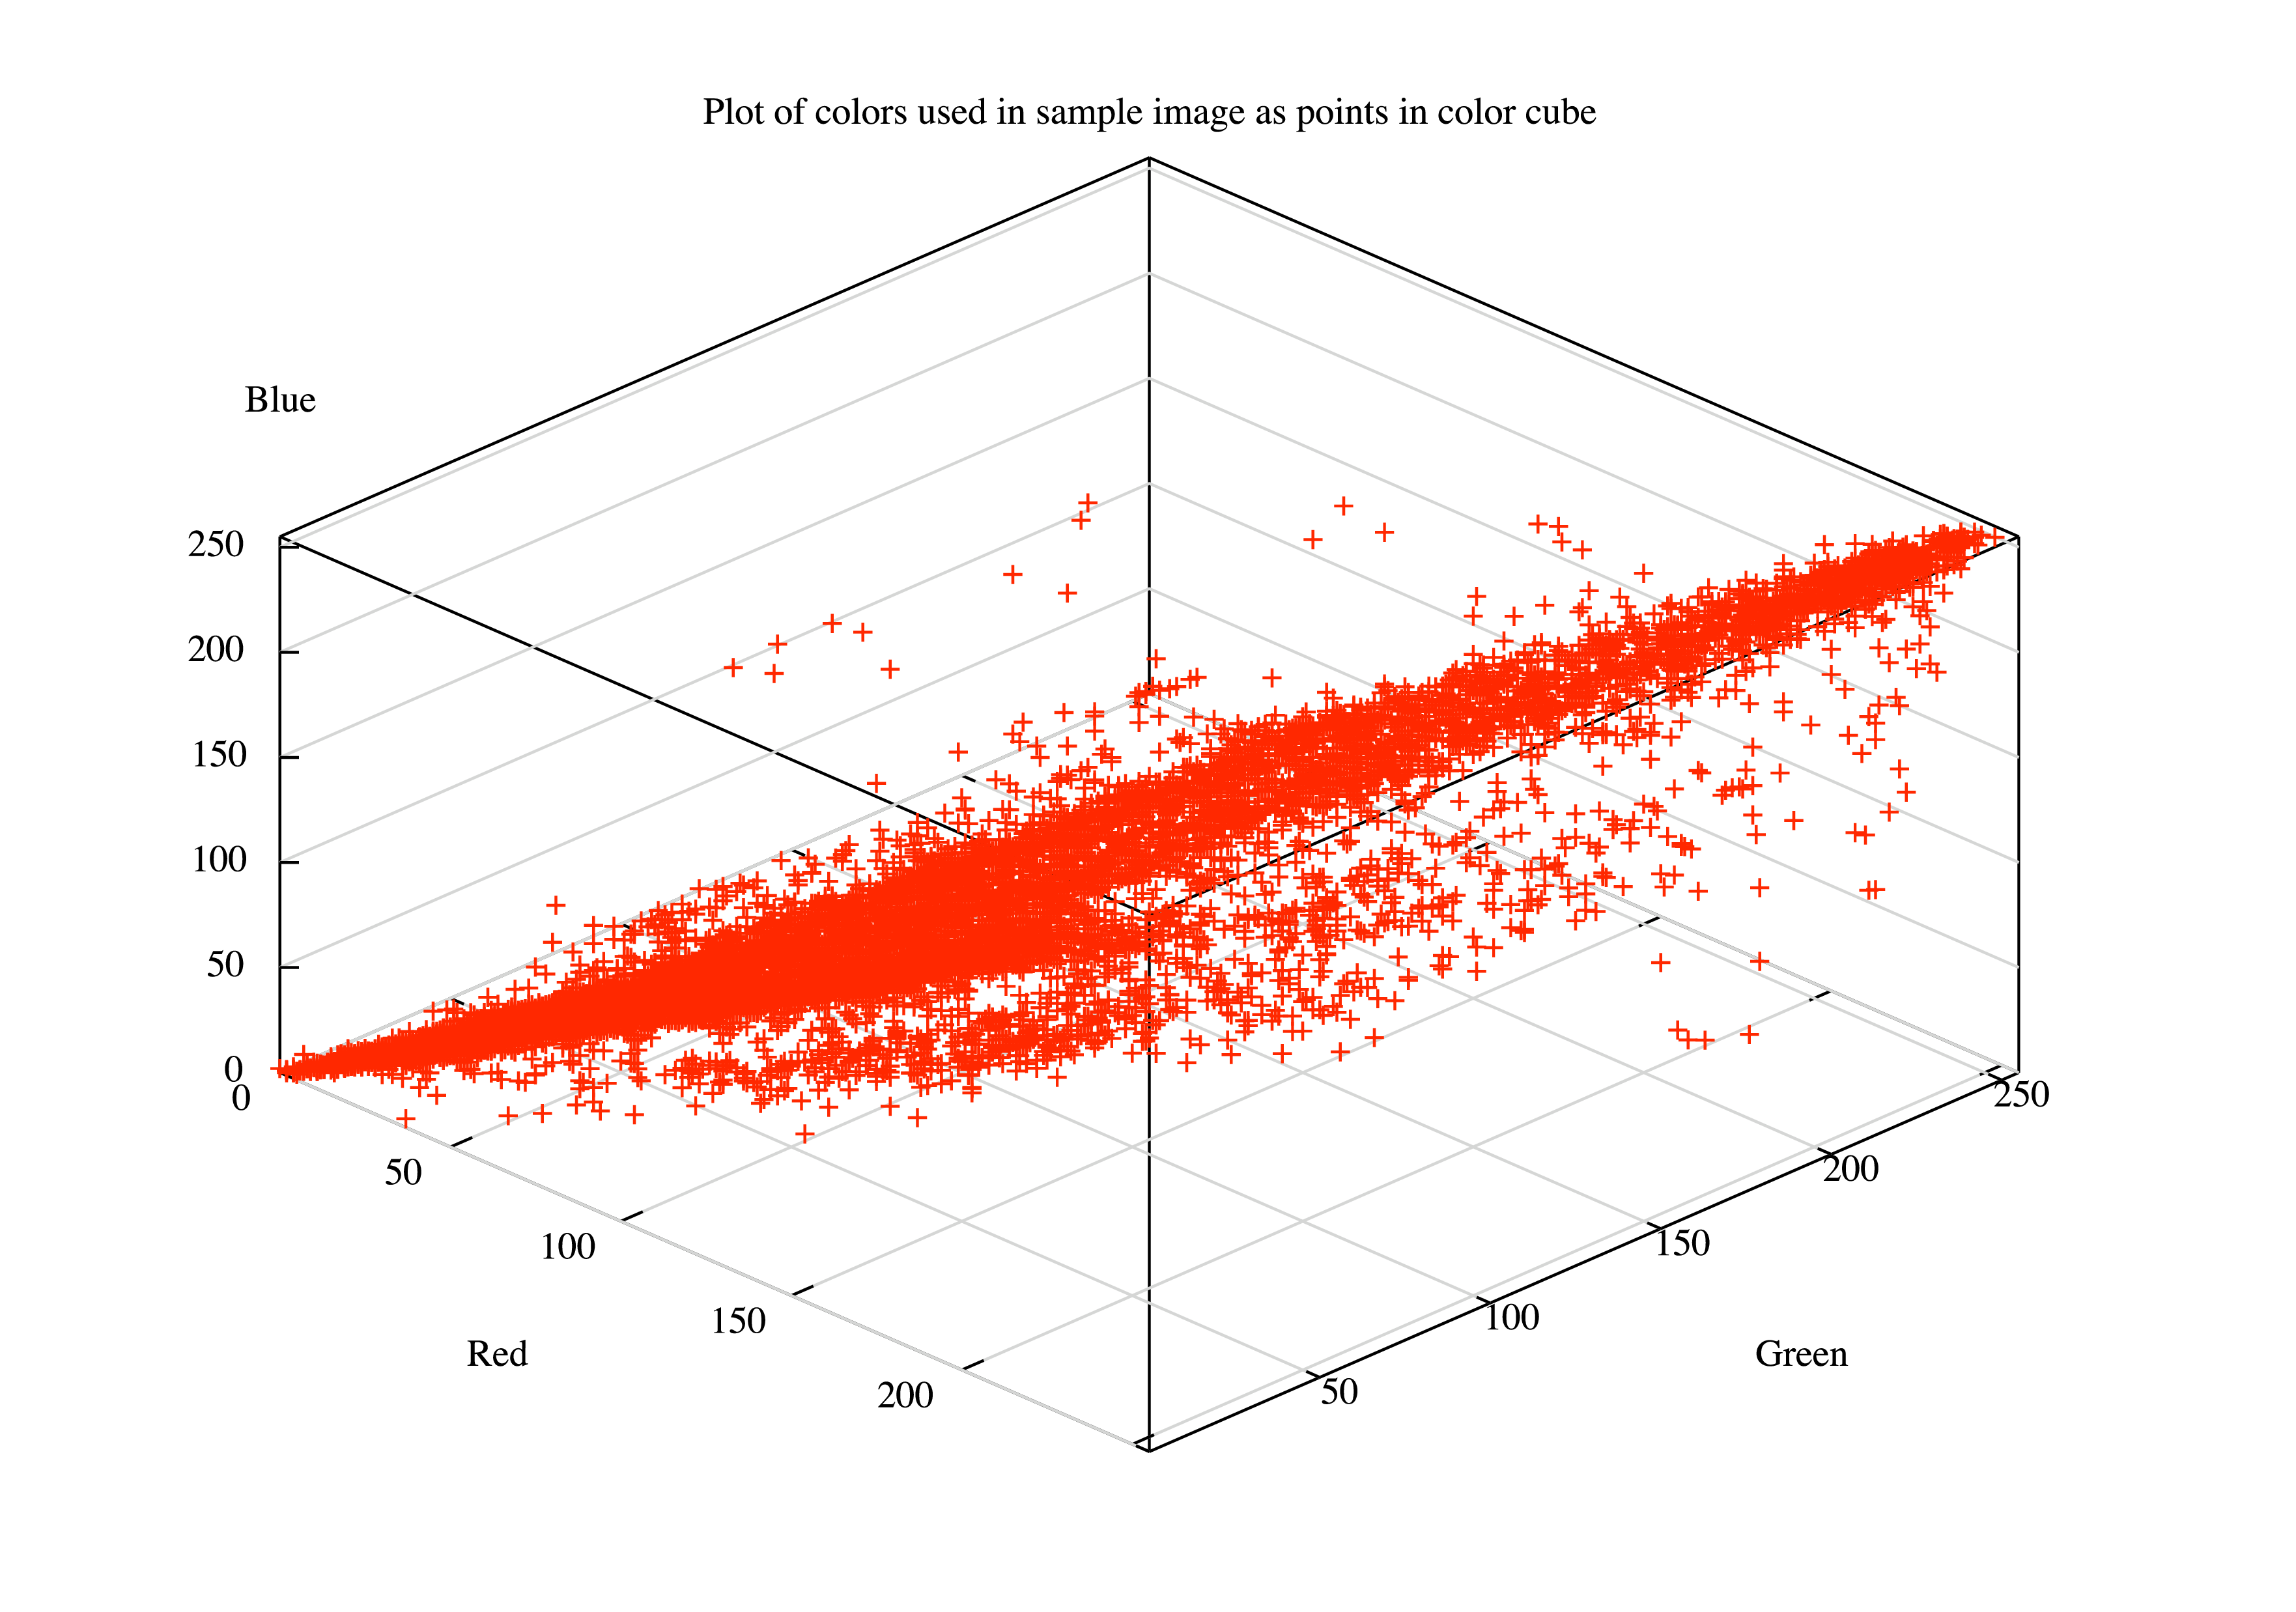
我们可能会注意到,每张图片里面真正用到的颜色就是那么几种,有很多颜色是被浪费掉的(比如一张森林的图片就是绿色偏多)。
Many colors may not appear in the image, and so parts of the cube may go completely unused. Allocating an unused color to the quantized image is a waste.
下图的红点是某张图片里面用到的颜色,白色的部分都是没有用到的。
也就是说,我们需要更聪明地选择颜色
There are several algorithms for dividing the color cube in different ways to allow for the better use of colors. In this section we are going to look at a tree-based solution.
我们接下来要学习的是一种 tree-based solution,叫做 OctTree。
OctTree 和二叉树很相似,但是每个 OctTree 的 node 都有 8 个 children。
OctTree Abstract Data Type
OctTree(): Create a new emptyOctTree.insert(r, g, b)Add a new node to theOctTreeusing the red, green, and blue color values as the key.find(r, g, b)Find an existing node, or the closest approximation, using the red, green, and blue color values as the search key.reduce(n)Reduce the size of theOctTreeso that there are 𝑛 or fewer leaf nodes.
OctTree 的逻辑
-
OctTree 的 root 代表整个 cube;
-
OctTree 第二层代表一个能把 cube 分为 8 等分的 slice (a single slice through each dimension (x, y, and z) that evenly divides the cube into 8 pieces.)
-
OctTree 的第三层把前面的 8 等分 cube 再进一步分成 8 等分(也就是总共 64 份),注意我们的 parent node 是包含所有 sub-cube 的。
我们沿着一条路径走的时候,我们一直在 parent cube 的范围中,但是我们会通过层层划分,进入到这个 cube 内部的某个地方。
As we follow any path down the tree we are staying within the boundary of the parent, but getting progressively more specific about the portion of the cube.
-
OctTree 的第八层代表的是 16.7 million colors,也就是整个 color cube。
OctTree 的作用
因为它是 hierarchical 的,所以我们可以用尽量小的 cube 来代表图片中经常用到的颜色,用尽量大的 cube 来代表图片中没有用到的颜色。
具体操作
- 对于图片中的每个 pixel:
- 在 OctTree 里面查找这个 color(应该在第八层,是个 leaf node);
- 假如这个颜色找不到的话,就新建一个第八层的 leaf node(并且要把这个 leaf node 连接到上面的 level);
- 假如这个 color 已经在 tree 里面了,就把 leaf node 里面的 counter + 1,用来记录有多少个 pixel 用到了这个颜色。
- 重复上面的操作,直到 leaf node 的数量少于或等于 target number of colors:
- 找到 deepest leaf node with the smallest number of uses
- Merge the leaf node and all of its siblings together to form a new leaf node.
- 剩下的 leaf nodes 组成这张图片的 color set;
- 要把原始的color map 到量化后的 value,只需要在 OctTree 里面找到 leaf node,然后 return leaf value。
Code of Image Quantizing
# We are using the Python image library for just four simple functions.
def build_and_display():
    im = Image.open("bubbles.jpg")
    w, h = im.size
    ot = OctTree()
    for row in range(0, h): # read every pixel
        for col in range(0, w):
            r, g, b = im.getpixel((col, row))
            ot.insert(r, g, b) # inset a pixel into OctTree

    ot.reduce(256) # reduction of the number of leaf nodes

    for row in range(0, h):
        for col in range(0, w):
            r, g, b = im.getpixel((col, row))
            nr, ng, nb = ot.find(r, g, b)
            im.putpixel((col, row), (nr, ng, nb))

    im.show() # display result to the screen
4. OctTree Code
OctTree 其实包含两个 class,OctTree 被上一部分提到的 build_and_display function 所使用,还有一个 class 是 OTNode,也就是 OctTree 的 Node class,它是 OctTree 的 inner class。
Inner class
A class that is defined inside another class is called an inner-class.
我们把 OTNode 作为 inner class 的原因是:
OTNode需要获取OctTree的一些信息,OctTree以外的 code 不需要直接使用OTNode这个 class(information hiding -> a good software engineering practice)
Code
-
我们把 max_level 设为 5 而不是 7 的原因是,这可以优化我们的算法,忽略一些不重要的 color info,把 tree size 降下来,也不会很大地影响最终图片的质量;
-
num_leaves 和 all_leaves 可以让我们记录 leaf node 的数量,直接 access leaves(不用走很长的 path 才能找到)。
-
insert 和 find 这两个 method 和我们之前讲的 tree 差不多,先看 root node 是否存在,然后在 call root node 的method
这两个 function 都用 r, g, b 来 identify node in a tree
-
reduce method 就是一个 while loop,跳出条件是 all_leafs > max_cubes(我们所需要的颜色数量)
-
find_min_cube method 能帮助我们找到最小的 cube,但这个 function 在 OctTree 有 8 层的时候效率不高(课后练习是提高这个 function 的效率)
-
only leaf node has red, green, blue and count.
class OctTree:
    def __init__(self):
        self.root = None
        self.max_level = 5 # limit the total depth of the tree
        self.num_leaves = 0
        self.all_leaves = []

    def insert(self, r, g, b):
        if not self.root:
            self.root = self.OTNode(outer=self)
        self.root.insert(r, g, b, 0, self)

    def find(self, r, g, b):
        if self.root:
            return self.root.find(r, g, b, 0)

    def reduce(self, max_cubes):
        while len(self.all_leaves) > max_cubes:
            smallest = self.find_min_cube()
            smallest.parent.merge()
            self.all_leaves.append(smallest.parent)
            self.num_leaves = self.num_leaves + 1

    def find_min_cube(self):
        min_count = sys.maxsize
        max_level = 0
        min_cube = None
        for i in self.all_leaves:
            if (
                i.count <= min_count
                and i.level >= max_level
            ):
                min_cube = i
                min_count = i.count
                max_level = i.level
        return min_cube

    # insert a new node into an OctTree
    # 1. where to place a new node (compute index)
    # 2. what should be the key (r, g, b)
    def insert(self, r, g, b, level, outer):
        if level < self.oTree.max_level:
            idx = self.compute_index(
                r, g, b, level
            )
            if self.children[idx] == None:
                self.children[idx] = outer.OTNode(
                    parent=self,
                    level=level + 1,
                    outer=outer,
                )
            self.children[idx].insert(
                r, g, b, level + 1, outer
            )
        else:
            if self.count == 0:
                self.oTree.num_leaves = (
                    self.oTree.num_leaves + 1
                )
                self.oTree.all_leaves.append(self)
            self.red += r
            self.green += g
            self.blue += b
            self.count = self.count + 1

    def compute_index(self, r, g, b, l):
        shift = 8 - l
        rc = r >> shift - 2 & 0x4
        gc = g >> shift - 1 & 0x2
        bc = b >> shift & 0x1
        return rc | gc | bc

    # use compute_index method
    def find(self, r, g, b, level):
        if level < self.oTree.max_level:
            idx = self.compute_index(r, g, b, level)
            if self.children[idx]:
                return self.children[idx].find(
                    r, g, b, level + 1
                )
            elif self.count > 0:
                return (
                    self.red // self.count,
                    self.green // self.count,
                    self.blue // self.count,
                )
            else:
                print("No leaf node to represent this color")
        else:
            return (
                self.red // self.count,
                self.green // self.count,
                self.blue // self.count,
            )

    def merge(self):
        for i in self.children:
            if i:
                 if i.count > 0:
                    self.oTree.all_leaves.remove(i)
                    self.oTree.num_leaves -= 1
                else:
                    print("Recursively Merging non-leaf...")
                    i.merge()
                self.count += i.count
                self.red += i.red
                self.green += i.green
                self.blue += i.blue
        for i in range(8):
            self.children[i] = None

    class OTNode:
        # 3 optional parameters
        # outer 让我们可以 access tree info
        # each node can have up to eight children
        def __init__(self, parent=None, level=0, outer=None):
            self.red = 0
            self.green = 0
            self.blue = 0
            self.count = 0
            self.parent = parent # track parent
            self.level = level # depth in the tree
            self.oTree = outer # reference to OctTree
            self.children = [None] * 8
计算 index
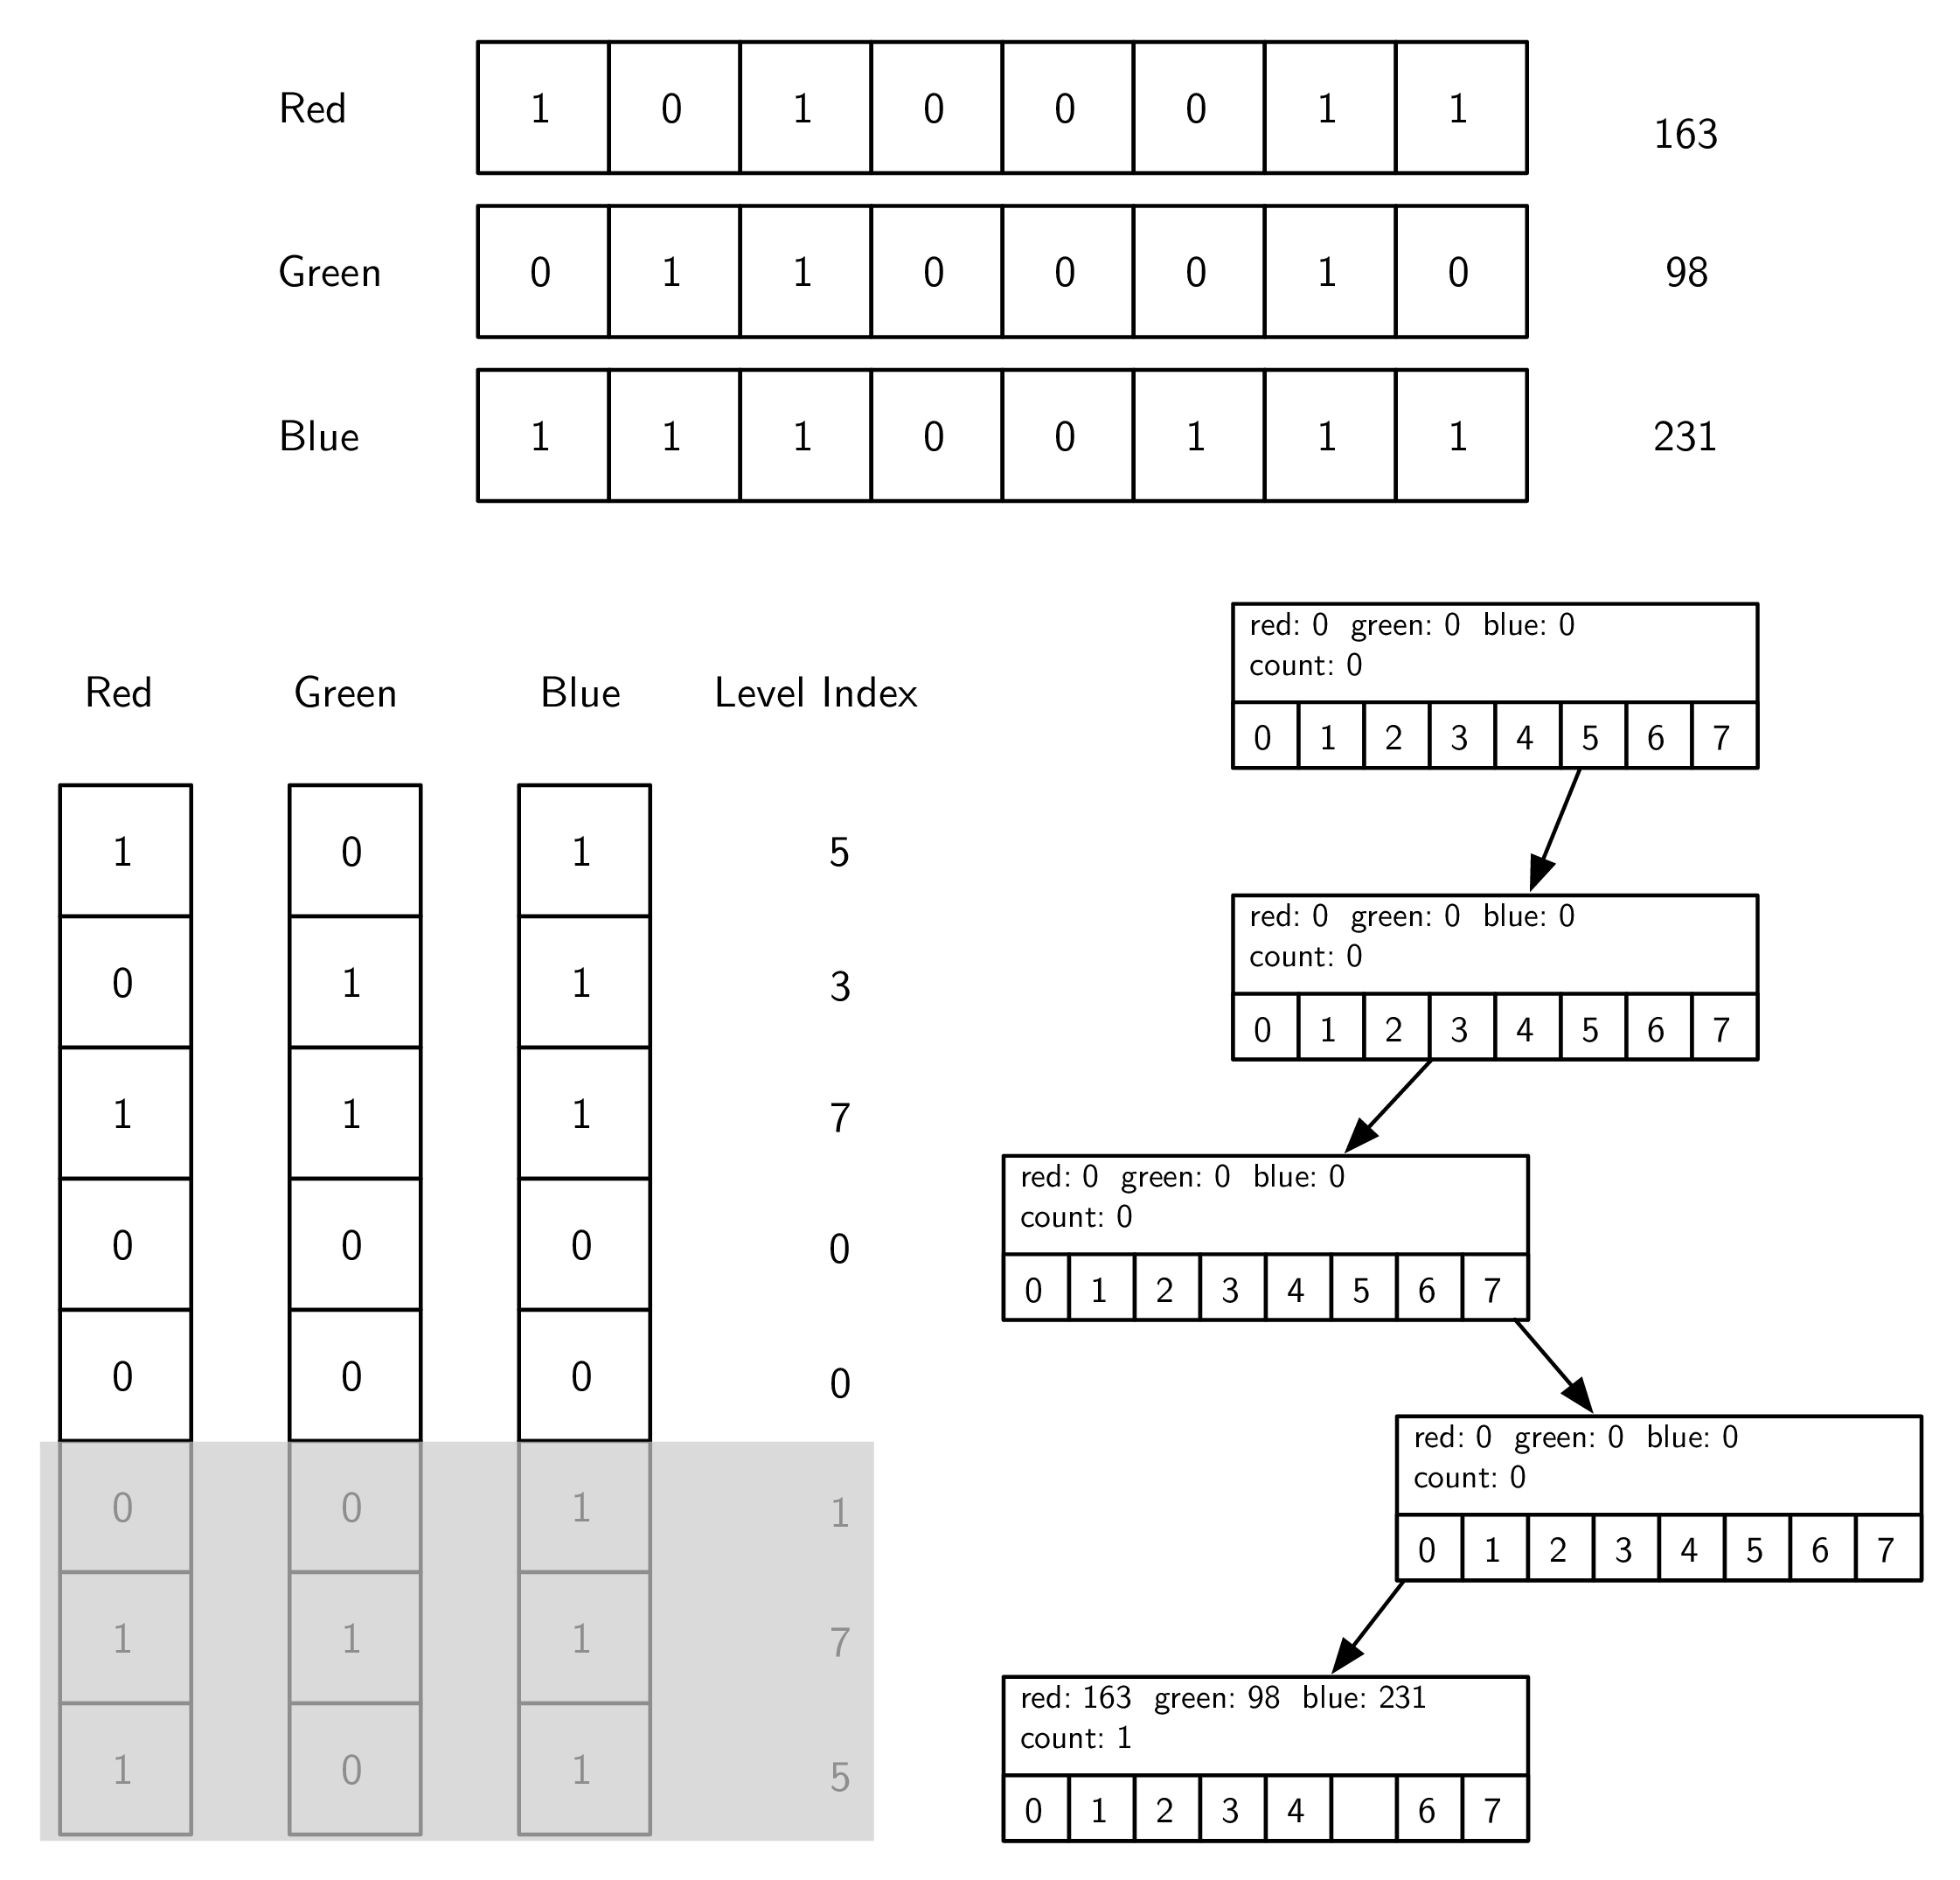
假设我们有个 component,r=163, g=98, b=231。
在 root level,我们用每个颜色的 most significant bit(最右边的bit)来组成一个数字(binary 101,或者是 decimal 5)。
The most significant bit (MSB) is the bit in a multiple-bit binary number with the largest value. This is usually the bit farthest to the left, or the bit transmitted first in a sequence. For example, in the binary number 1000, the MSB is 1, and in the binary number 0111, the MSB is 0.
我们在 compute_index 里面用到了一些操作符:
>>= right shift operation。
& = bitwise and
| = logical or
The bitwise
orand bitwiseandoperations work just like the logical operations used in conditionals, except that they work on the individual bits of a number.The shift operation simply moves the bits 𝑛 places to the right, filling in with zeros on the left and dropping the bits as they go off the right.
def compute_index(self, r, g, b, l):
        shift = 8 - l
        rc = r >> shift - 2 & 0x4
        gc = g >> shift - 1 & 0x2
        bc = b >> shift & 0x1
        return rc | gc | bc
Insert
当我们计算出 index 之后,我们就到那个 subtree 里面去(下图的右下方那一块),我们先找到 children array 里面的 position 5 node;
假如那个 position 没有 node,我们就创建一个 node;
然后我们继续往下,直到到达 max_level;
在 max_level 我们会停止查找,把数据存起来;
- 注:我们不会覆盖原来在 leaf node 里面的数据,只是在已有的 component 里面增加 color component,然后 increment reference counter;这样我们可以计算任何一个在 current node 下面的 color cube 里面的 average color,也就是说,leaf node 可以代表 a number of similar colors in the color cube.
# insert a new node into an OctTree
# 1. where to place a new node (compute index)
# 2. what should be the key (r, g, b)
def insert(self, r, g, b, level, outer):
    if level < self.oTree.max_level:
      idx = self.compute_index(
        r, g, b, level
      )
      if self.children[idx] == None:
        self.children[idx] = outer.OTNode(
          parent=self,
          level=level + 1,
          outer=outer,
        )
        self.children[idx].insert(
          r, g, b, level + 1, outer
        )
        else:
          if self.count == 0:
            self.oTree.num_leaves = (
              self.oTree.num_leaves + 1
            )
            self.oTree.all_leaves.append(self)
            self.red += r
            self.green += g
            self.blue += b
            self.count = self.count + 1
find
它也用到了 index computation,因为它需要遍历树才能找到匹配颜色数值的node。
它有三个exit conditions:
- 到达 max_level,我们会把存在这个 leaf node 里面的 average color information 返回;
- 我们找到了一个 height <
max_level的 leaf node,这在树经历了 reduce 之后是可能的; - 我们想要去一个不存在的 subtree -> 这是 error;
# use compute_index method
def find(self, r, g, b, level):
    if level < self.oTree.max_level:
      idx = self.compute_index(r, g, b, level)
      if self.children[idx]:
        return self.children[idx].find(
          r, g, b, level + 1
        )
      elif self.count > 0:
        return (
          self.red // self.count,
          self.green // self.count,
          self.blue // self.count,
        )
      else:
        print("No leaf node to represent this color")
        else:
          return (
            self.red // self.count,
            self.green // self.count,
            self.blue // self.count,
          )
merge
这个功能让 parent 可以把所有的 children 都归纳进来,变成一个 leaf node。
merge 的时候,我们就是用 weighted average color of the color represented by each of those siblings 来代表所有的 sibling。
Since all the siblings are relatively close to each other in color space, the average is a good representation of all of them.
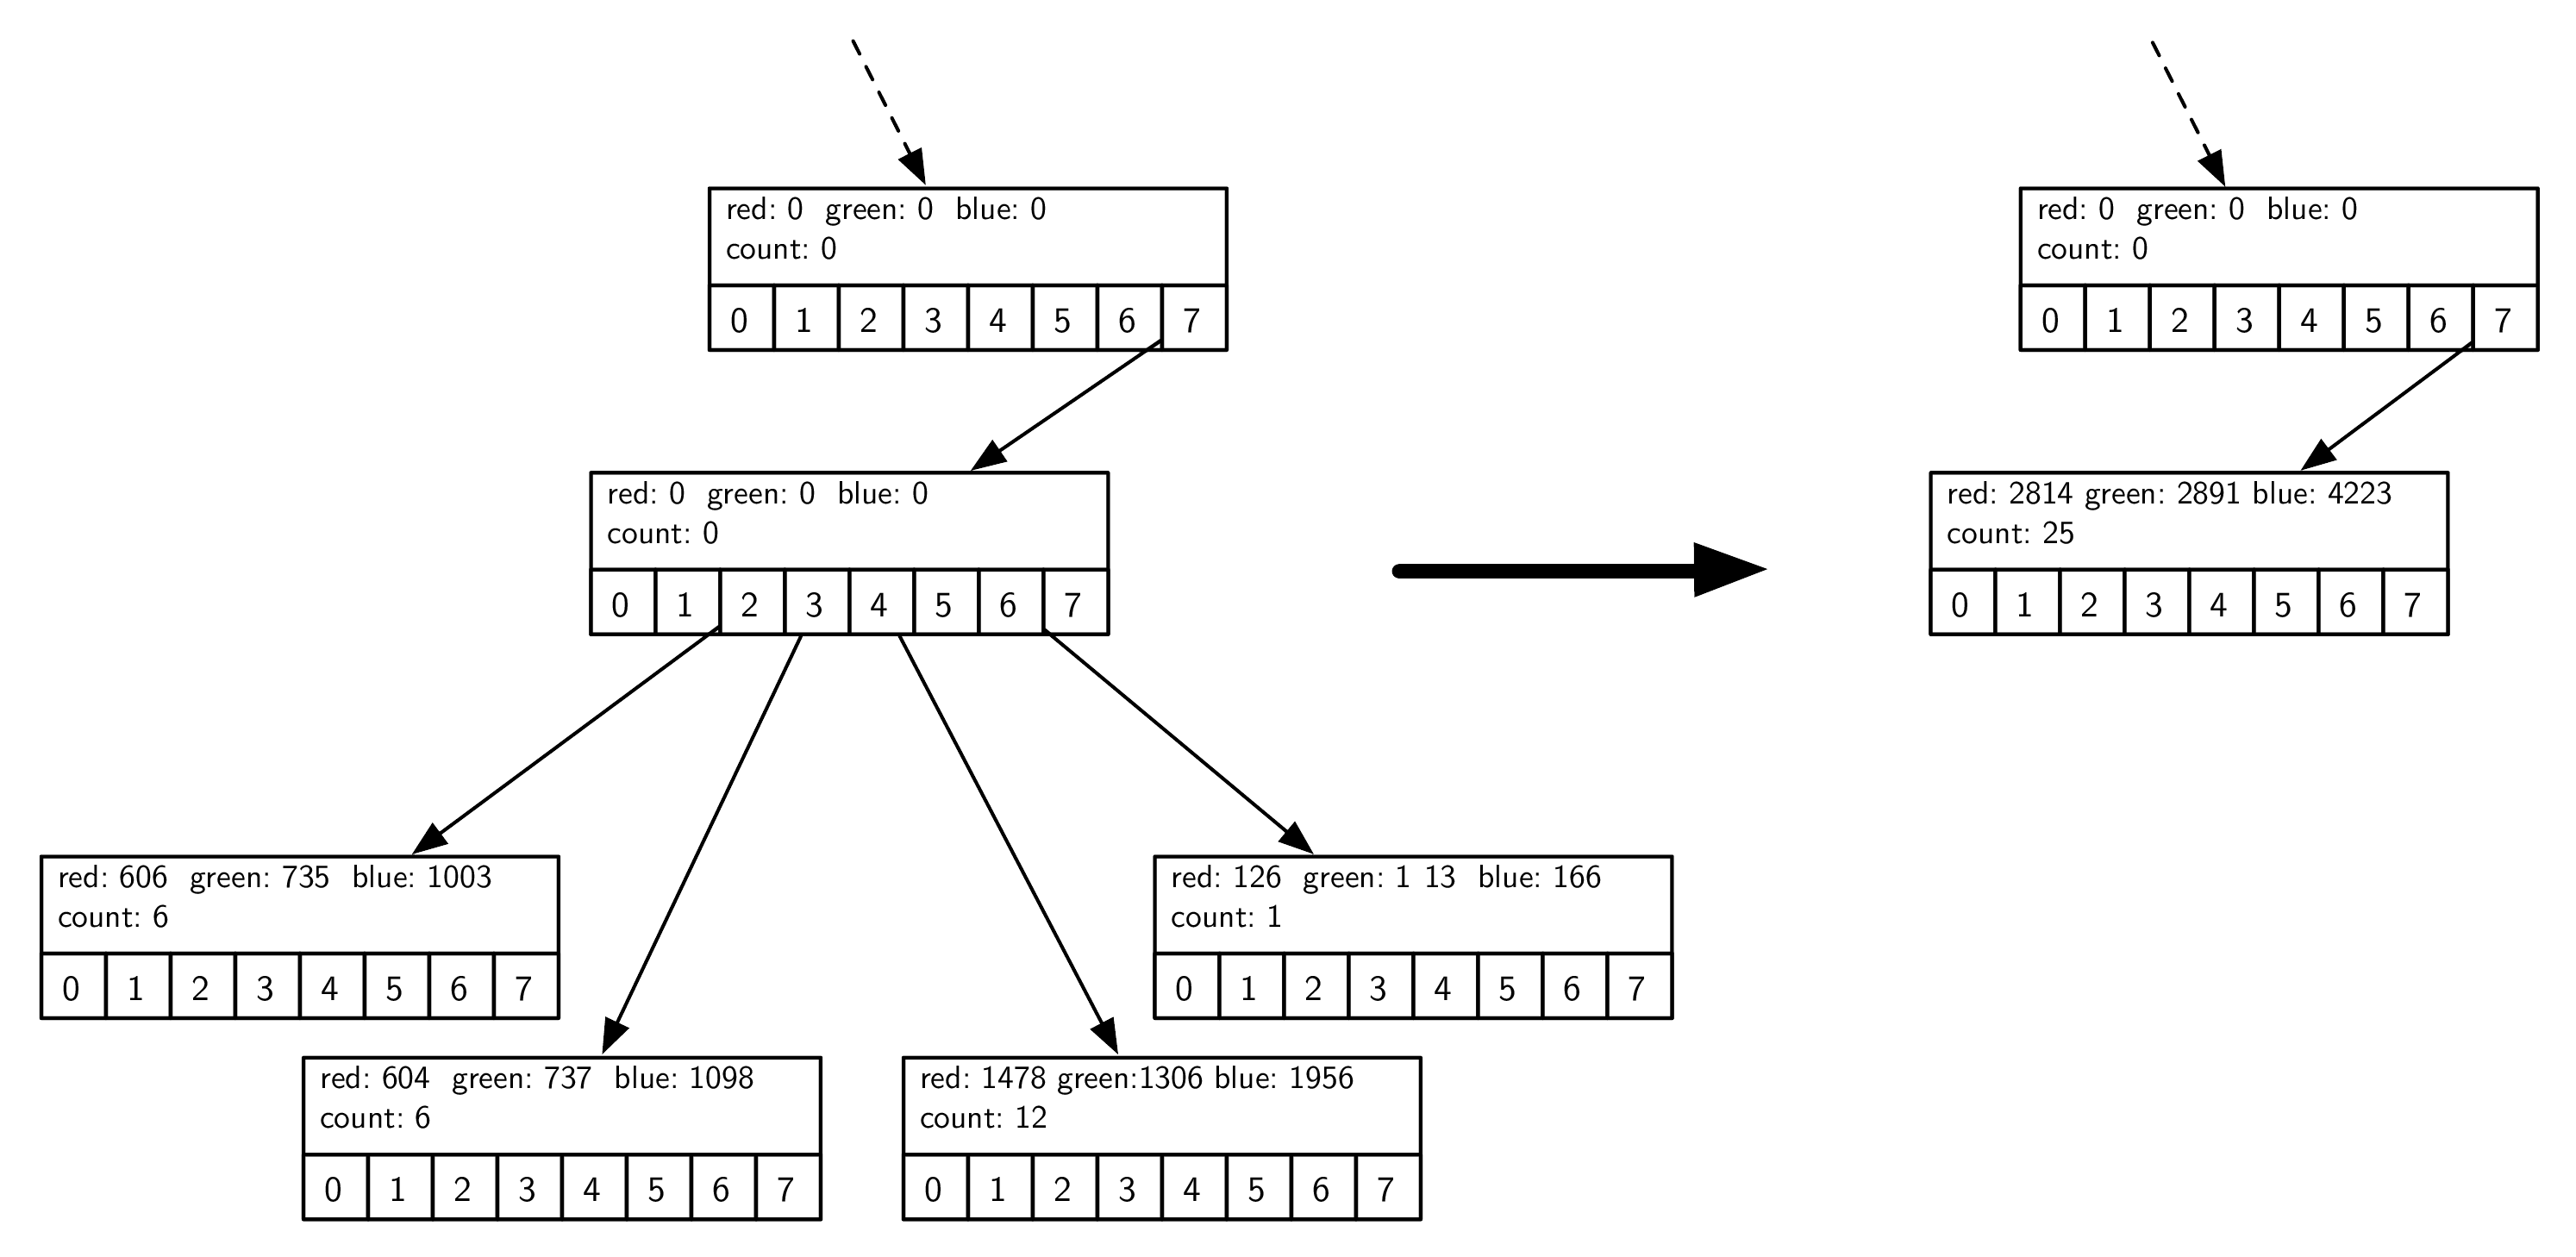
上图里面我们可以看到左边的中间 node 经过 merge 之后变成了一个 leaf node(右边)。
原来的四个 leaf node 分别是:(101, 122, 167), (100, 122, 183), (123, 108, 163), (126, 113, 166),每个 node 有不同的 count,node 的 identify value 和实际的 color value 是不同的~
The leaf node that gets created from all of these has an id of (112, 115, 168). This is close to the average of the four, but weighted more towards the third color tuple due to the fact that it had a reference count of 12.
Remember, the identifying values are different from the total plus count numbers shown in the figure (just divide to get the identifiers).
def merge(self):
    for i in self.children:
        if i:
             if i.count > 0:
                self.oTree.all_leaves.remove(i)
                self.oTree.num_leaves -= 1
            else:
                print("Recursively Merging non-leaf...")
                i.merge()
            self.count += i.count
            self.red += i.red
            self.green += i.green
            self.blue += i.blue
    for i in range(8):
        self.children[i] = None
5. OctTree 的好处
OctTree 只用图片中有的颜色,并且根据颜色的出现频率来进行压缩,所以最后输出的量化图片比一开始的简单压缩法质量要好得多。
6. 结语
还有很多其他的方式可以压缩图片,比如 run-length encoding, discrete cosine transform, and Huffman encoding.
另外,量化图片还可以通过一种叫做 dithering(图像抖动/抖色) 的技巧来改进,它把不同的颜色放在一起,然后人类的眼睛会进行颜色融合,图片看起来更加真实,这种技巧常用于彩色打印的报纸(三种颜色的墨水+黑色墨水)。
Dithering is a process by which different colors are placed near to each other so that the eye blends the colors together, forming a more realistic image. This is an old trick used by newspapers for doing color printing using just black plus three different colors of ink.
An OctTree provides an efficient way to reduce the number of colors used to represent an image.